The ICT Rejection Block is a price action concept taught by ICT (Inner Circle Trader) for identifying potential accumulation and distribution around important market highs and lows.
Many traders focus only on a previous swing high or swing low. They wait for price to move above the high or below the low before looking for a false breakout.
But price does not always need to create a clear higher high or lower low before a significant rejection occurs.
Sometimes price trades beyond the body of previous candles, moves into the wick area and then strongly rejects from the range.
This wick-based price range is known as an ICT Rejection Block.
A Rejection Block can form from one candle or multiple candles. The important part is the relationship between the extreme wick and the highest or lowest candle body within the swing.
By studying the candle opens, closes and wicks, traders can identify areas where buy-side or sell-side liquidity may have been taken before price moves in the opposite direction.
What is an ICT Rejection Block?
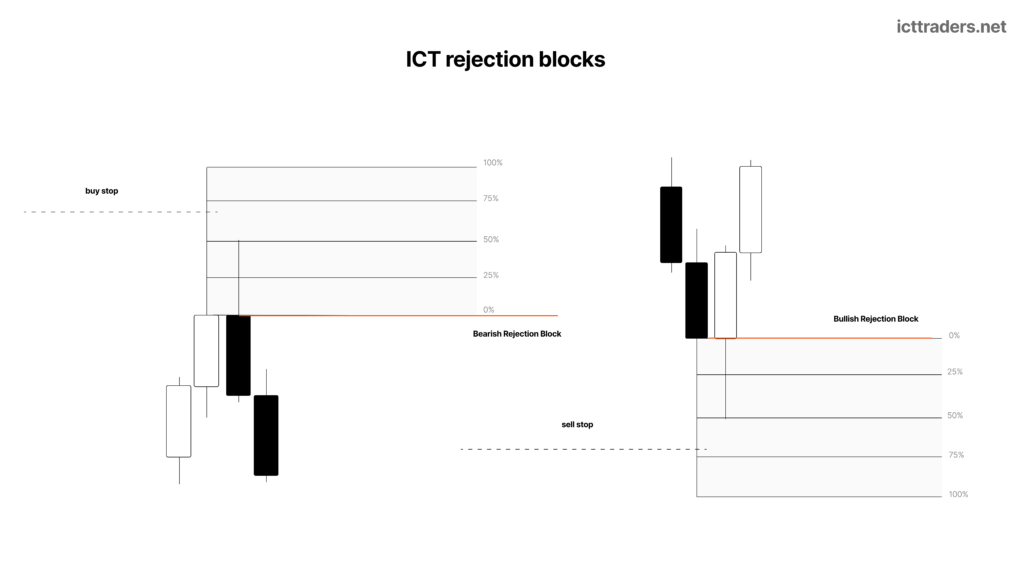
An ICT Rejection Block is a price range formed between the extreme wick of a swing and the highest or lowest candle body inside that swing.
At a swing high, price may trade above the bodies of previous candles and create one or several upper wicks.
This move into the upper wick area may run buy-side liquidity.
If price rejects the higher prices and moves lower, the wick range can form a Bearish ICT Rejection Block.
At a swing low, price may trade below the bodies of previous candles and create one or several lower wicks.
Price reaches into the lower wick area and may run sell-side liquidity.
When price rejects the lower prices and rallies higher, the wick range can become a Bullish ICT Rejection Block.
The key idea is that traders should not look only at the absolute previous high or low.
The open and close of the candles are also important reference points.
A rejection may occur after price violates the highest candle body at a swing high or the lowest candle body at a swing low.
Price does not always need to trade beyond the complete wick of the previous swing.
The Main Idea Behind ICT Rejection Block
The main concept of the ICT Rejection Block is based on liquidity and the orders inside price action.
Traditional chart traders may see a group of candles near a high and identify a bull flag, pennant or another continuation pattern.
ICT looks at the same price action differently.
Instead of focusing on the geometric shape of the pattern, attention is placed on the orders and liquidity available around the candle bodies and wicks.
As ICT explains in the lesson:
“Price does not move around because of animal patterns or supposed geometry in price action; it’s based on the orders.”
The highest open or close at a swing high may create a price reference.
When price trades above this candle body, buy-side liquidity may be reached.
The price does not necessarily need to trade above the highest wick.
A run above the highest candle body followed by rejection can indicate distribution.
At a swing low, price may move below the lowest open or close.
Sell-side liquidity below the candle bodies may be taken.
Price may then strongly reject the lower range and show accumulation.
This body-to-wick relationship creates the ICT Rejection Block.
Why Does an ICT Rejection Block Form?
An ICT Rejection Block forms when price trades beyond an important candle body and moves into the wick area before rejecting from the price range.
Consider a swing high.
Several candles may form near the high.
Among these candles, one price level represents the highest open or highest close.
Price later trades above this body reference.
Buyers may enter because price appears to be moving higher.
Buy-side liquidity may also be available above the candle body.
Price trades into the upper wick range but fails to create sustained movement higher.
Distribution takes place and price begins moving lower.
The range between the highest high of the wick and the highest open or close creates the Bearish Rejection Block.
The opposite occurs at a swing low.
Several candles may create lower wicks.
Find the lowest open or lowest close within the swing.
Price moves below this candle body and trades into the lower wick range.
Sell-side liquidity may be taken.
Price then rejects the lower price and accumulation occurs.
The range between the lowest wick and the lowest open or close forms the Bullish Rejection Block.
Types of ICT Rejection Block
There are mainly two types of ICT Rejection Block:
- Bearish Rejection Block
- Bullish Rejection Block
Both models use candle bodies and wick extremes.
The Bearish Rejection Block focuses on buy-side liquidity and distribution at a swing high.
The Bullish Rejection Block focuses on sell-side liquidity and accumulation at a swing low.
Bearish ICT Rejection Block
A Bearish ICT Rejection Block forms around a price high with a long upper wick or multiple upper wicks.
According to the ICT lesson, the ideal bearish setup is generally found within a major or intermediate-term downtrend.
Price creates a swing high.
One candle or several candles may form the high.
The candles show upper wicks where price has traded above the candle bodies.
The first step is to find the highest high in the swing.
Then find the highest open or highest close that reaches into the highest wick area.
The range between these two price points creates the Bearish Rejection Block.
Price has moved above the body of the candle or candles and reached into the upper wick.
This can run buy-side liquidity before price declines.
The entire wick range is treated as a potential selling block.
ICT explains that the range can be approached similarly to a bearish order block when price trades back into the area.
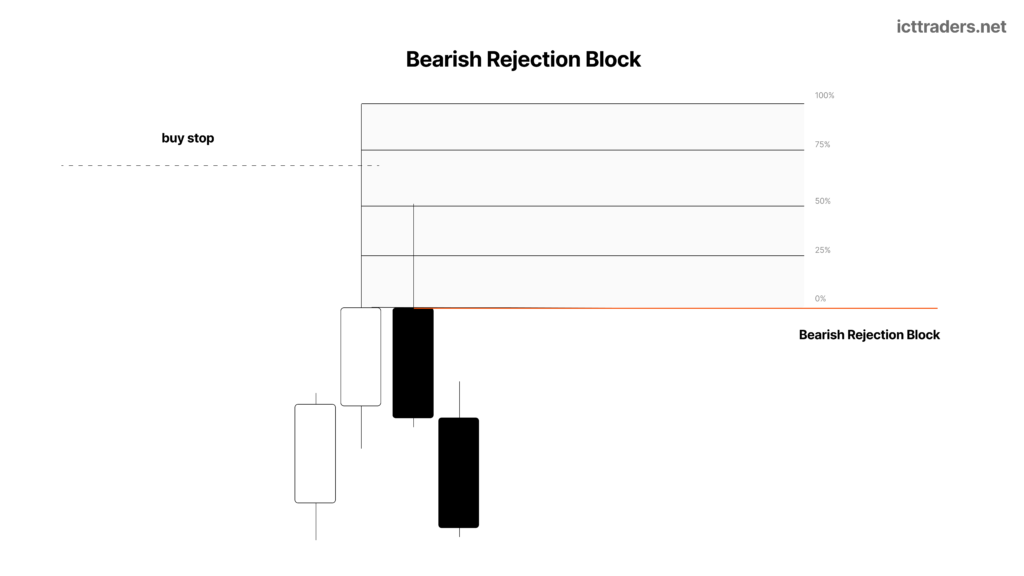
Bearish ICT Rejection Block Formation
The basic formation is:
Swing High → Upper Wick or Wicks Form → Highest Candle Body Violated → Buy-Side Liquidity Taken → Price Rejects → Distribution → Price Moves Lower
The most important point is that price does not always need to create a new absolute higher high.
Suppose a previous candle has the highest wick.
Another candle later trades above the highest open or close of the previous candle but remains below the previous wick high.
A classical failure swing based only on the highs may not appear.
But the candle body has still been violated.
According to the ICT Rejection Block concept, this movement can indicate buy-side liquidity being taken inside the wick range.
A bearish rejection may then follow.
How to Identify a Bearish ICT Rejection Block
First, find a significant swing high.
The swing high should show a clear upper wick or multiple upper wicks.
Now identify the highest wick high within the swing.
This is the upper boundary of the Bearish Rejection Block.
Next, study the candle bodies.
Find the highest open or highest close inside the swing high.
It does not matter whether the candle is bullish or bearish.
The important point is the highest body reference.
This highest open or close becomes the lower boundary of the Rejection Block.
The price range between the highest candle body and the highest wick is the Bearish ICT Rejection Block.
Now observe the subsequent price movement.
Price may trade above the highest body reference and move into the wick range.
The move can take buy-side liquidity.
When price fails to continue higher and rejects from the range, the market may be showing distribution.
A later retracement into the Rejection Block can become a potential bearish trade area.
Rules of Bearish ICT Rejection Block
A Bearish ICT Rejection Block should form at a swing high.
The swing should contain a long upper wick or multiple upper wicks.
Identify the highest high of the swing.
Find the highest open or highest close inside the swing high.
The highest candle body and highest wick frame the Rejection Block.
Price should move above the body reference and trade into the wick range.
The price movement may run buy-side liquidity.
Price should show rejection from the higher range.
The ideal setup is generally found within a major or intermediate-term bearish market condition.
The Bearish Rejection Block can later be treated as a potential selling range.
Price does not always need to create a higher high above the previous wick.
Bullish ICT Rejection Block
A Bullish ICT Rejection Block forms at a swing low with a long lower wick or multiple lower wicks.
The ideal bullish setup is generally found within a major or intermediate-term uptrend.
Price forms a swing low.
One candle or multiple candles may create lower wicks.
The first step is to identify the lowest wick low.
Next, traders study the candle bodies within the swing.
Find the lowest open or lowest close.
The range between the lowest candle body and the lowest wick creates the Bullish Rejection Block.
Price trades below the candle body and moves into the lower wick area.
Sell-side liquidity may be taken.
When price strongly rejects the lower range and moves higher, accumulation may have taken place.
The Bullish ICT Rejection Block can then become an important price area for a later retracement.
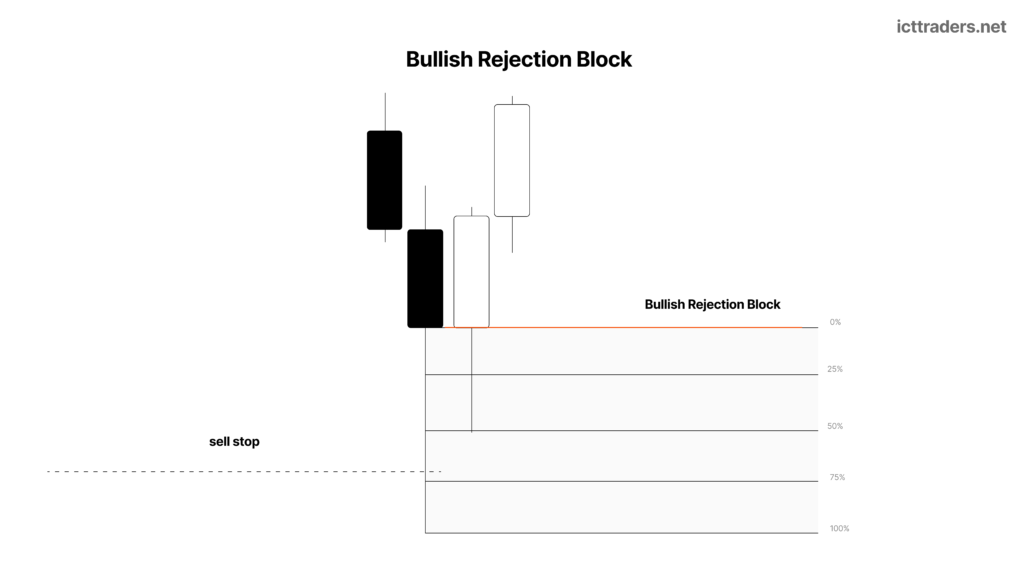
Bullish ICT Rejection Block Formation
The basic formation is:
Swing Low → Lower Wick or Wicks Form → Lowest Candle Body Violated → Sell-Side Liquidity Taken → Price Rejects → Accumulation → Price Moves Higher
Again, price does not always need to create a new lower low below the previous wick.
Price may simply trade below the lowest open or close and move into the wick range.
Sell-side liquidity inside the lower range may be taken.
A strong rejection can then occur.
This is why candle bodies are important when studying an ICT Rejection Block.
Looking only at the absolute low may cause traders to miss the accumulation process occurring inside the wick.
How to Identify a Bullish ICT Rejection Block
First, find a significant swing low.
Look for a long lower wick or several lower wicks.
Find the lowest wick low in the swing.
This becomes the lower boundary of the Bullish Rejection Block.
Now find the lowest open or lowest close among the candles forming the swing.
This candle body reference becomes the upper boundary of the block.
The price range between the lowest candle body and lowest wick is the Bullish ICT Rejection Block.
Wait for price to move below the candle body reference and enter the lower wick area.
This movement may reach sell-side liquidity.
Observe the price reaction.
A strong bullish rejection suggests that accumulation may have taken place.
When price later retraces into the Bullish Rejection Block, the range can be viewed as a potential buying area.
Rules of Bullish ICT Rejection Block
A Bullish ICT Rejection Block should form around a swing low.
The swing low should contain a long lower wick or multiple lower wicks.
Identify the lowest wick low.
Find the lowest open or lowest close inside the swing.
The lowest candle body and the lowest wick frame the Bullish Rejection Block.
Price should trade below the body reference and enter the wick range.
Sell-side liquidity may be taken.
Price should reject the lower price range.
The ideal condition is generally a major or intermediate-term bullish market environment.
The Bullish Rejection Block can be treated as a potential buying range.
Price is not always required to trade below the previous absolute wick low.
How to Draw an ICT Rejection Block
Drawing an ICT Rejection Block is different from marking a normal order block.
For a Bearish Rejection Block, find a swing high with one or several upper wicks.
Mark the highest wick high.
Then find the highest open or close inside the swing.
Draw a range from the highest body reference to the highest wick.
This complete range is the Bearish ICT Rejection Block.
For a Bullish Rejection Block, find a swing low with one or several lower wicks.
Mark the lowest wick low.
Find the lowest open or close inside the swing.
Draw a range from the lowest wick to the lowest body reference.
This range becomes the Bullish ICT Rejection Block.
The bullish or bearish candle colour is not the main consideration.
ICT specifically explains that it does not matter whether the candle with the important body reference closes bullish or bearish.
The open and close price is the important part.
Single Candle and Multiple Candle Rejection Blocks
An ICT Rejection Block does not need to form from only one candle.
A single candle may create a clear long wick.
In this condition, identifying the rejection range can be simple.
For a bearish model, the highest wick and relevant body level frame the range.
For a bullish model, the lowest wick and relevant body level frame the range.
However, Rejection Blocks may also form across several candles.
Multiple candles may create several wicks around a swing high or swing low.
In this case, traders should not mark each wick as a separate Rejection Block.
Study the entire swing.
At a swing high, find the highest high and the highest open or close reaching into the wick area.
At a swing low, find the lowest low and the lowest open or close associated with the wick area.
The complete price range creates the Rejection Block.
According to ICT, the wicks draw the trader’s attention to the potential pattern.
The candle bodies help define the actual parameters of the block.
Candle Bodies and ICT Rejection Block
Candle bodies have an important role in the ICT Rejection Block concept.
Most traders place all their attention on the candle wick.
They see a previous high and wait for price to trade above it.
Or they see a previous low and wait for price to trade below it.
ICT teaches traders to also study the candle opens and closes.
At a swing high, determine the highest open or close.
A later candle may move above this body reference but remain below the highest wick.
This can still show distribution.
At a swing low, identify the lowest open or close.
Price may trade below this body level but remain above the previous lowest wick.
This can still show accumulation.
Therefore, price does not always need to create a classic false breakout above a previous high or below a previous low.
The body of the candle can provide an earlier liquidity reference.
ICT Rejection Block and Liquidity
Liquidity is a major part of the ICT (Inner Circle Trader) methodology.
Above market highs, buy-side liquidity may exist.
Below market lows, sell-side liquidity may exist.
A Turtle Soup setup normally focuses on price moving above an old high or below an old low before rejecting.
The ICT Rejection Block expands this idea.
At a swing high, liquidity may be taken when price trades above the highest candle body and moves into the upper wick.
Price may not need to violate the complete wick high.
At a swing low, sell-side liquidity may be reached when price moves below the lowest candle body and enters the lower wick.
Price may not need to create a completely new lower low.
This gives traders another way to study accumulation and distribution at market turning points.
ICT Rejection Block and Turtle Soup
The ICT Rejection Block and ICT Turtle Soup concept are closely related, but they are not exactly the same formation.
In a classic Turtle Soup sell setup, price trades above an old high.
Buy stops above the high are taken.
Price rejects and moves lower.
In a Turtle Soup long setup, price trades below an old low.
Sell stops are taken.
Price rejects and rallies higher.
The Rejection Block does not always require price to violate the absolute wick high or wick low.
A bearish rejection may occur after price trades above the highest candle body inside the swing.
A bullish rejection may occur after price trades below the lowest candle body.
This means a trader who always waits for the complete swing high or low to be violated may miss some rejection formations.
The ICT Rejection Block allows traders to study liquidity delivery inside the wick range.
ICT Rejection Block and Order Block
An ICT Rejection Block can be treated similarly to an Order Block after the rejection range has been properly identified.
For a Bearish Rejection Block, the area between the highest body and highest wick creates a selling range.
When price returns to the range, the block can be treated similar to a bearish order block.
For a Bullish Rejection Block, the range between the lowest wick and lowest candle body creates a buying area.
A retracement into the range may be treated similar to a bullish order block.
However, the method of identifying the range is different.
An ICT Order Block is generally identified from specific institutional candle ranges associated with price delivery and displacement.
An ICT Rejection Block is specifically framed by the candle body and extreme wick of a swing high or swing low.
This wick-based framing is one of the most important differences.
How to Trade a Bearish ICT Rejection Block
First, identify the broader bearish market condition.
Look for a major or intermediate-term downtrend or an important higher-time-frame resistance area.
Find a swing high with long upper wicks.
Mark the highest high.
Identify the highest open or highest close in the swing.
Draw the Bearish Rejection Block between these two levels.
Wait for price to reject from the range.
When price later trades back towards the block, the lower boundary of the rejection range becomes an important reference.
An aggressive trader may consider the price area directly for a potential sell setup.
The ICT lesson also discusses waiting for price to trade slightly through the level and then using weakness as confirmation.
In some conditions, a sell stop entry below the body reference may be considered after price trades into the Rejection Block but fails to reach the higher wick.
The exact entry model should be combined with proper risk management and additional ICT confirmation.
The expectation is for price to seek lower prices or sell-side liquidity.
How to Trade a Bullish ICT Rejection Block
First, identify a bullish market condition.
The ideal formation generally occurs in a major or intermediate-term uptrend.
Find a swing low containing a lower wick or multiple lower wicks.
Mark the lowest wick.
Find the lowest open or lowest close inside the swing.
Draw the Bullish Rejection Block between the lowest wick and candle body reference.
Observe the bullish rejection from the range.
When price later returns to the Rejection Block, the upper boundary becomes an important reference point.
A potential buying setup can be considered around the range.
Traders may enter near the Rejection Block or wait for price to move into the range and show a bullish response.
The expectation is for price to move towards higher prices or buy-side liquidity.
The Rejection Block should be combined with market context, liquidity and a defined entry model.
Using ICT Rejection Block as a Profit Target
The ICT Rejection Block is not used only for finding entries.
It can also help traders identify possible profit-taking areas.
Suppose a trader is holding a short position and price is moving towards a previous swing low.
The swing low contains several lower wicks.
Instead of automatically expecting price to trade below the lowest wick, the trader can identify the lowest open or close.
The Bullish Rejection Block may begin at this candle body reference.
Price can potentially react from the rejection range without taking the absolute low.
A short trader may therefore consider reducing or closing a position near the upper area of the Bullish Rejection Block.
The same idea applies in reverse for long positions approaching a Bearish Rejection Block.
This is an important lesson from ICT.
Traders should not always demand that price reaches beyond the complete wick before taking profit.
The candle bodies may provide a more sensitive liquidity and rejection reference.
Best Market Condition for ICT Rejection Block
Market context is important when trading an ICT Rejection Block.
The ideal Bearish Rejection Block is generally found in a major or intermediate-term downtrend.
A bearish rejection at a random location may have less importance.
The setup becomes more meaningful when it forms around an important higher-time-frame resistance level, bearish Order Block or another bearish price area.
The ideal Bullish Rejection Block is generally found in a major or intermediate-term uptrend.
A rejection block around higher-time-frame support or another bullish institutional price area may have greater importance.
Therefore, traders should not search for Rejection Blocks independently from the broader price narrative.
The market direction and location of the setup should support the expected price movement.
Common Mistakes When Identifying ICT Rejection Block
One common mistake is looking only at the wick high or wick low.
The candle body is an important part of the ICT Rejection Block.
Another mistake is believing that price must always make a higher high before a bearish rejection.
A Bearish Rejection Block may form when price trades above the highest candle body but remains below the highest wick.
The same mistake occurs with bullish setups.
Price does not always need to make a new lower low.
A move below the lowest candle body into the wick range may be enough to show accumulation.
Another mistake is marking every candle wick as a Rejection Block.
The wick should form around a meaningful swing high or swing low.
Market context is also important.
Traders also select the wrong body reference.
For a bearish model, identify the highest open or highest close.
For a bullish model, identify the lowest open or lowest close.
The candle colour is not important.
Another mistake is treating the Rejection Block as a guaranteed reversal area.
The block is a price range that should be studied with liquidity, market direction and additional confirmation.
Simple ICT Rejection Block Checklist
Before considering an ICT Rejection Block, check the following:
Swing Point: Is there a clear swing high or swing low?
Wicks: Are long wicks or multiple wicks present?
Market Context: Does the setup support the major or intermediate-term trend?
Extreme Price: Have you identified the highest high or lowest low?
Candle Body: Have you identified the highest open or close for a bearish setup or lowest open or close for a bullish setup?
Liquidity: Has price traded beyond the candle body and into the wick range?
Rejection: Did price reject from the higher or lower range?
Block Range: Is the Rejection Block correctly framed between the candle body and wick extreme?
Retracement: Has price returned to the Rejection Block?
Price Objective: Is there a logical liquidity target in the expected direction?
This checklist helps keep the Rejection Block connected with the actual ICT concept rather than treating every wick as a trade setup.
Final Understanding of ICT Rejection Block
The ICT Rejection Block is a wick-based price range used to identify potential accumulation or distribution around important swing highs and swing lows.
A Bearish ICT Rejection Block forms when price trades above the highest candle body at a swing high and reaches into the upper wick range before rejecting lower.
The block is framed between the highest open or close and the highest wick high.
A Bullish ICT Rejection Block forms when price trades below the lowest candle body at a swing low and reaches into the lower wick range before rejecting higher.
The block is framed between the lowest wick low and the lowest open or close.
The most important lesson is that price does not always need to create a new higher high or lower low to show a failure swing.
By studying candle opens, closes and wick ranges, traders can identify more subtle forms of distribution and accumulation.
The ICT (Inner Circle Trader) Rejection Block concept encourages traders to stop viewing price only through traditional chart patterns.
Instead, understand the liquidity and orders behind the movement.
Find the swing.
Study the candle bodies.
Frame the wick range.
Observe the rejection.
Then use the ICT Rejection Block as a potential entry, reaction or profit-taking area within the broader price narrative.