High Probability Daytrade Setups are built by combining higher-timeframe direction, liquidity, PD Arrays, session timing, and disciplined risk management. This framework was developed by Michael J. Huddleston, the founder of ICT (Inner Circle Trader), and is taught in the 2017 ICT Private Mentorship Core Content Month 08.
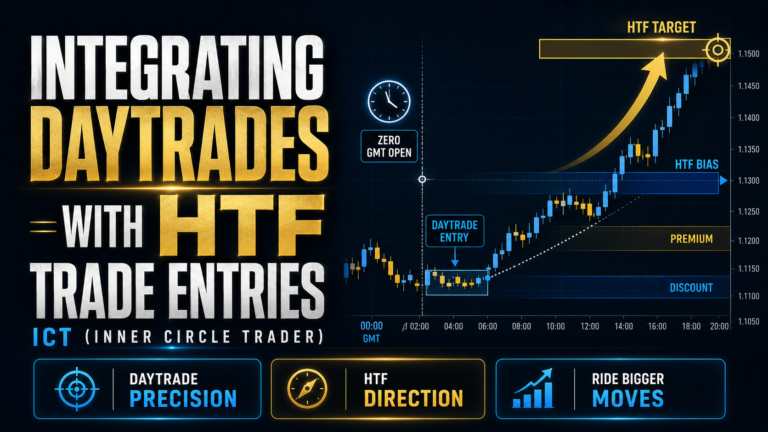
The goal is not to find a trade every day. The goal is to identify conditions where the daily and four-hour charts provide a clear directional bias, then use lower-timeframe price action to enter in alignment with that bias.
“The highest importance is placed on the higher time frame daily and/or four-hour direction.”
— Michael J. Huddleston
What Makes a Day Trade High Probability?
A high-probability day trade begins with three questions:
- What is the most likely direction?
- From which price level should the move begin?
- Which opposing price level is the likely target?
The trader should first establish whether price is likely to move from:
- Discount to premium
- Premium to discount
Once the higher-timeframe direction is clear, the trader can use lower-timeframe ranges, liquidity raids, Order Blocks, Fair Value Gaps, and session timing to frame the entry.
The lower-timeframe setup should support the higher-timeframe idea. It should not be used to create a bias that does not already exist.
Higher-Timeframe Direction Comes First
The daily and four-hour charts carry the most importance.
A bullish environment may show:
- Positive reactions from discount PD Arrays
- Bullish Order Blocks holding
- Old lows being rejected
- Fair Value Gaps below price being filled
- Short-term premium arrays being violated
- Clear upside liquidity objectives
A bearish environment may show:
- Negative reactions from premium PD Arrays
- Bearish Order Blocks holding
- Old highs being rejected
- Fair Value Gaps above price being filled
- Short-term discount arrays being violated
- Clear downside liquidity objectives
When daily and four-hour direction agree, the day-trade setup generally carries more weight.
Bullish Day-Trade Framework
When the daily or four-hour direction is bullish, the trader should focus on retracement entries and sell-side liquidity raids.
Useful reference ranges include:
- Previous day’s low to high
- Previous day’s New York session low to high
- Previous London session low to high
- London session extreme to the price level formed before New York
- Previous day’s low as a sell-stop objective
The main idea is to buy a retracement while price is expected to move from a higher-timeframe discount PD Array toward a premium PD Array.
A bullish setup becomes stronger when price trades below a known short-term low, takes sell-side liquidity, and reaches a discount array during the London Kill Zone.
Bearish Day-Trade Framework
When the daily or four-hour direction is bearish, the trader should focus on retracement entries and buy-side liquidity raids.
Useful reference ranges include:
- Previous day’s high to low
- Previous day’s New York session high to low
- Previous London session high to low
- London session extreme to the price level formed before New York
- Previous day’s high as a buy-stop objective
The objective is to sell a retracement while price is expected to move from a higher-timeframe premium PD Array toward a discount PD Array.
A bearish setup becomes stronger when price trades above a short-term high, takes buy-side liquidity, and reaches a premium array during the London Kill Zone.
Seasonal and Quarterly Context
Seasonality is not required, but it can improve the quality of the setup.
Bullish day trades are more attractive when:
- The market is inside a seasonally bullish period
- The current quarter is expected to be bullish
- A new bullish quarter has begun
- The daily chart has reacted positively from discount
- Price has a clear path toward a premium PD Array
Bearish day trades are more attractive when:
- The market is inside a seasonally bearish period
- The current quarter is expected to be bearish
- A new bearish quarter has begun
- The daily chart has reacted negatively from premium
- Price has a clear path toward a discount PD Array
If the next objective is difficult to identify, the setup may not be high probability.
Ideal Days of the Week
For this model, the preferred days for London day trades are generally:
- Monday
- Tuesday
- Wednesday
These days often provide cleaner weekly expansion.
Later in the week, price may have already delivered much of the weekly range or reached a higher-timeframe objective.
This does not mean Thursday and Friday can never produce trades. It means the trader should place greater emphasis on the early part of the week when searching for the most favorable conditions.
Central Bank Dealers Range Filter
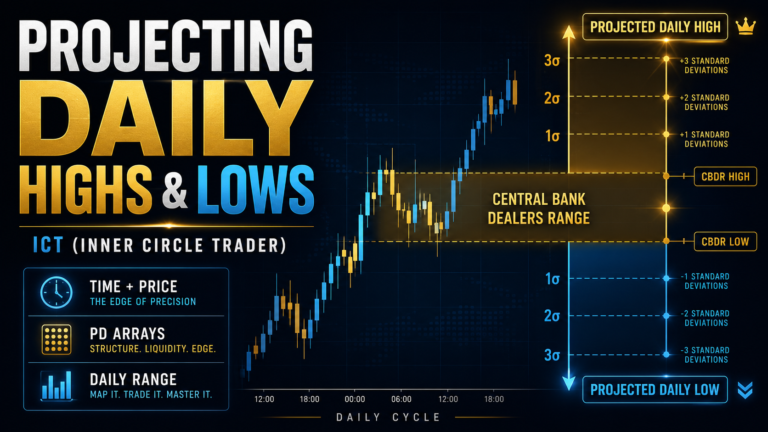
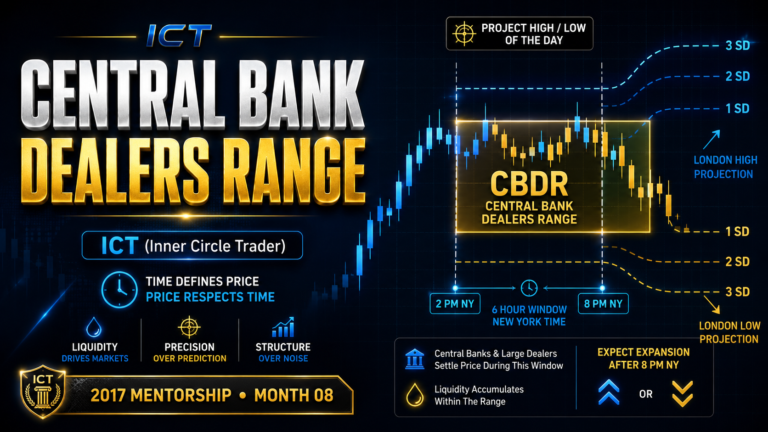
The Central Bank Dealers Range should ideally remain below:
- 40 pips
A smaller range suggests that price has been held in consolidation, allowing liquidity to build before the London session.
The range can also be used to calculate standard-deviation projections.
Bullish traders may look for price to move one or two standard deviations below the range.
Bearish traders may look for price to move one or two standard deviations above the range.
The projection should overlap with a valid PD Array.
Asian Range Filter
Before Frankfurt opens, the Asian Range should ideally remain:
- 20 pips or less
A narrow Asian Range gives London the opportunity to raid liquidity and expand.
A large or erratic Asian Range may indicate that the move has already started or that conditions are too unstable for a clean setup.
For a bullish setup, price may trade beneath the Asian Range low before reversing higher.
For a bearish setup, price may trade above the Asian Range high before reversing lower.
ICT adds approximately five pips beyond the Asian Range when considering spread and liquidity raids.
London Kill Zone Entry Window
The primary entry window is generally:
- 02:00 to 04:00 New York time
During this period, the trader is usually seeking:
- The low of the day in a bullish setup
- The high of the day in a bearish setup
The trade should be executed on:
- 15-minute chart
- 5-minute chart
The time window alone is not enough. The setup should also align with higher-timeframe direction, liquidity, standard deviations, and a PD Array.
High Probability Bullish Daytrade Setups
Sell-Side Raid Below the Asian Range
In a bullish environment, price may move below the Asian Range low and trigger sell stops.
The ideal setup forms when the liquidity raid overlaps with:
- Bullish Order Block
- Fair Value Gap
- Liquidity Void
- Discount PD Array
- One or two standard deviations
- London Kill Zone timing
The trader can then look for bullish confirmation and expansion.
Previous New York Session Low Raid
A short-term low from the previous New York session can provide sell-side liquidity.
If London trades below that low and reaches a discount PD Array, the trader may look for a long entry.
This works best when the daily and four-hour charts are already bullish.
Bullish Order Block Below a Short-Term Low
A powerful condition appears when a bullish Order Block rests below a short-term low.
Price may first take the low, enter the Order Block, and then reverse.
This combines:
- Liquidity
- Discount pricing
- Institutional reference point
- Time of day
One Standard Deviation in a Strong Bullish Market
When the higher-timeframe bias is strongly bullish, one standard deviation below the Central Bank Dealers Range or Asian Range may be sufficient.
The level should still overlap with a discount PD Array.
Judas Swing Lower After Midnight
Price may decline between midnight and 02:00 New York time.
This initial move lower can act as the Judas Swing.
If price enters a discount PD Array during the London Kill Zone, the trader may look for a long setup.
Liquidity Void Fill Below a Short-Term Low
Price may trade below a short-term low and complete a larger liquidity void.
If the void is filled inside discount and the market remains bullish, the reaction can provide a high-probability entry.
First Retracement After a Midnight Rally
Sometimes price rallies immediately after midnight without producing an initial decline.
In that situation, the trader can wait until 02:00 to 04:00 and buy the first retracement into a five- or 15-minute bullish Order Block.
This avoids chasing the initial rally.
Two Sell-Side Raids Without an Upside Protraction
If price creates a low and later trades below that same low again without first producing a meaningful upside move, the second raid may form a Turtle Soup setup.
This should only be traded when the broader market conditions remain bullish.
High Probability Bearish Daytrade Setups
Buy-Side Raid Above the Asian Range
In a bearish environment, price may rally above the Asian Range high and trigger buy stops.
The strongest setup appears when this raid overlaps with:
- Bearish Order Block
- Fair Value Gap
- Liquidity Void
- Premium PD Array
- One or two standard deviations
- London Kill Zone timing
Previous New York Session High Raid
A short-term high from the previous New York session can provide buy-side liquidity.
If London trades above that high and reaches a premium PD Array, the trader may consider selling.
Bearish Order Block Above a Short-Term High
A bearish Order Block positioned above a short-term high creates an ideal liquidity and price overlap.
Price may raid the high, trade into the bearish Order Block, and then reverse lower.
One Standard Deviation in a Strong Bearish Market
When the higher-timeframe direction is strongly bearish, price may need to rally only one standard deviation above the Central Bank Dealers Range or Asian Range.
The projection should overlap with a premium PD Array.
Judas Swing Higher After Midnight
Price may rally from midnight into the early London session.
If this rally reaches a premium PD Array, it can provide the high of the day and a possible short entry.
Liquidity Void Fill Above a Short-Term High
Price may trade above a known high and complete an upside liquidity void.
If the market is bearish and price reaches premium, the completed void may provide a reversal point.
First Retracement After a Midnight Decline
Sometimes price declines immediately after midnight.
Instead of chasing the move, wait for the first retracement into a five- or 15-minute bearish Order Block during the London Kill Zone.
Two Buy-Side Raids Without a Downside Protraction
If price forms a high and later trades above it again without first making a meaningful downside move, the second raid may form a bearish Turtle Soup setup.
Stop-Loss Rules for Bullish Day Trades
Michael J. Huddleston provides specific stop guidelines depending on the entry model.
Central Bank Dealers Range and PD Array Overlap
Place the stop approximately:
- 30 pips below the entry
Run Below the Asian Range
Place the stop approximately:
- 40 pips below the entry
Sell-Stop Raid
Place the stop approximately:
- 30 pips below the raided low
First Retracement Into a Bullish Order Block
Place the stop approximately:
- 10 pips below the lowest low of the day
Second Sell-Side Raid or Turtle Soup
Place the stop approximately:
- 30 pips below the second raid
Other Bullish Setups
Calculate 50% of the five-day Average Daily Range and subtract it from the Asian Range low.
This provides a broader volatility-based protective stop.
Stop-Loss Rules for Bearish Day Trades
Central Bank Dealers Range and PD Array Overlap
Place the stop approximately:
- 30 pips above the entry
Run Above the Asian Range
Place the stop approximately:
- 40 pips above the entry
Buy-Stop Raid
Place the stop approximately:
- 30 pips above the raided high
First Retracement Into a Bearish Order Block
Place the stop approximately:
- 10 pips above the highest high of the day
Second Buy-Side Raid or Turtle Soup
Place the stop approximately:
- 30 pips above the second raid
Other Bearish Setups
Calculate 50% of the five-day Average Daily Range and add it to the Asian Range high.
Do Not Move the Stop Too Early
One of the most important rules is to avoid rushing the stop to breakeven.
London price action can produce a second liquidity raid before the primary move begins.
Moving the stop too early can result in:
- Being stopped out at breakeven
- Missing the full daily expansion
- Re-entering emotionally
- Chasing price after the move begins
ICT suggests waiting until price has delivered approximately:
- 40% to 50% of the expected daily range
Only then should the trader consider moving the stop to breakeven.
Profit-Taking Rules for Bullish Trades
First Partial Profit
Always consider taking something off after:
- 20 to 30 pips
Standard-Deviation Objectives
Take another partial after every:
- Two standard deviations
These can be measured from the Asian Range or Central Bank Dealers Range.
Previous Day’s High
Take profit around:
- Previous day’s high
- Five to 15 pips above the high
Price may create a Turtle Soup reversal after taking buy-side liquidity.
Equilibrium of the 60-Minute Range
Take something off around the 50% level of the 60-minute range being traded.
Equilibrium may cause price to pause or reverse.
Average Daily Range
By the time price reaches the five-day Average Daily Range projection, approximately:
- 60% to 80% of the position should be closed
Previous Week’s High
Take partial profit when price trades above the previous weekly high.
Previous Month’s High
Take partial profit when price trades above the previous monthly high.
Time-Based Profit Taking
Consider taking profit:
- At or just above 05:00 New York time
- At a short-term high before 07:00
- During a rally between 10:00 and 11:00
These periods may produce reversals or session transitions.
Profit-Taking Rules for Bearish Trades
First Partial Profit
Always consider taking something off after:
- 20 to 30 pips
Standard-Deviation Objectives
Take another partial after every two standard deviations of the Asian Range or Central Bank Dealers Range.
Previous Day’s Low
Take profit around:
- Previous day’s low
- Five to 15 pips below the low
Equilibrium of the 60-Minute Range
Take something off around the 50% level of the current 60-minute range.
Average Daily Range
Close approximately 60% to 80% when price reaches the five-day Average Daily Range projection.
Previous Week’s Low
Take partial profit when price trades below the previous weekly low.
Previous Month’s Low
Take partial profit when price trades below the previous monthly low.
Time-Based Profit Taking
Consider taking profit:
- At or before 05:00 New York time
- At a short-term low before 07:00
- During a decline between 10:00 and 11:00
Additional Profit Objectives
Other useful targets include:
- 100% measured move
- 127% Fibonacci extension
- 168% Fibonacci extension
- Symmetrical price swings
- Opposing Order Blocks
- Fair Value Gaps
- Weekly or monthly liquidity
These levels become more meaningful when they overlap with standard-deviation projections or higher-timeframe PD Arrays.
Not Every Rule Applies to Every Trade
The model contains several entry, stop, and profit-taking rules.
Not all of them will be present in one setup.
For example:
- The previous weekly high may be far away
- The Average Daily Range may already be fulfilled
- Price may never reach two standard deviations
- London may complete the move before New York
- The setup may not involve a previous-day liquidity raid
The trader should identify which rules are relevant before entering.
This is why the framework requires judgment rather than mechanical execution.
Common Mistakes
Starting With a Lower-Timeframe Signal
A five-minute Order Block is not enough without higher-timeframe direction.
Trading Against Daily or Four-Hour Bias
A technically attractive setup may fail if it conflicts with institutional order flow.
Ignoring the Asian Range
A wide Asian Range reduces the probability of a clean London manipulation.
Entering Without a Clear Target
A high-probability setup should have an obvious opposing PD Array or liquidity objective.
Chasing the Midnight Move
When price moves immediately after midnight, wait for the first retracement instead of entering late.
Moving to Breakeven Too Early
London can revisit the entry area before expanding.
Holding the Entire Position for One Distant Target
Partial profit-taking protects the trade and reduces emotional pressure.
Expecting Every Condition to Appear
Each setup will contain only some of the available criteria.
High Probability Daytrade Setup Checklist
Before entering, confirm:
- Is the daily direction bullish or bearish?
- Does the four-hour chart support that direction?
- Is price reacting from premium or discount?
- Is the daily chart respecting a valid PD Array?
- Is the opposing target clear and unobstructed?
- Is the day Monday, Tuesday, or Wednesday?
- Is the Central Bank Dealers Range below 40 pips?
- Is the Asian Range approximately 20 pips or less?
- Is the setup forming between 02:00 and 04:00 New York time?
- Has buy-side or sell-side liquidity been raided?
- Does the raid overlap with a PD Array?
- Does a standard-deviation level support the entry?
- Is the entry visible on the five- or 15-minute chart?
- Is the stop positioned according to the setup type?
- Have profit objectives been identified before entry?
- Is the setup aligned with the daily draw on liquidity?
Final Thoughts
High Probability Daytrade Setups are not based on one indicator or one candlestick pattern.
The model begins with higher-timeframe direction. The trader then waits for price to reach a meaningful premium or discount location, raid liquidity, and react from a valid PD Array during the correct time window.
The Asian Range, Central Bank Dealers Range, standard deviations, previous session highs and lows, Order Blocks, Fair Value Gaps, and Average Daily Range all help refine the setup.
Risk management is equally important. The stop should be positioned according to the entry model, not moved too early, and profits should be taken systematically as price reaches logical objectives.
A high-probability day trade is therefore a combination of:
- Direction
- Liquidity
- Time
- Price
- Risk management
- Profit management
The trader’s job is not to force every rule into every setup. It is to recognize which high-probability scenario the market is presenting and execute it with discipline.