Reducing Risk & Maximizing Potential Reward In Swing Setups is a swing-trading framework taught by Michael J. Huddleston, founder of the ICT (Inner Circle Trader) methodology, in the 2017 ICT Private Mentorship Core Content Month 06.
The lesson focuses on an important principle: professional trading is not about placing large bets or using the maximum leverage offered by a broker. It is about risking a small, predefined amount of capital while targeting a much larger higher-timeframe price move.
Michael J. Huddleston explains:
“Professionals, when they’re trading, look to frame setups with low risk and high reward.”
This idea is the foundation of effective swing-trade management.
Why Risk Reduction Comes First
Before entering a swing trade, the trader must know the maximum amount they are prepared to lose.
Using a large percentage of the account on a single setup turns trading into gambling. Even a valid technical idea can fail, so no trade should carry enough risk to cause serious financial or emotional damage.
A professional swing trader focuses on:
- Small percentage risk per trade
- Clearly defined invalidation
- Limited leverage
- Higher-timeframe trade locations
- Large reward relative to risk
- Low trade frequency
- Consistent execution
The goal is not to become rich from one or two trades. The goal is to remain protected while allowing high-quality setups to produce meaningful returns.
Use Monthly and Weekly Levels for Context
The first step in Reducing Risk & Maximizing Potential Reward In Swing Setups is framing the trade around monthly and weekly PD Arrays.
These higher-timeframe levels provide the context for the entire setup.
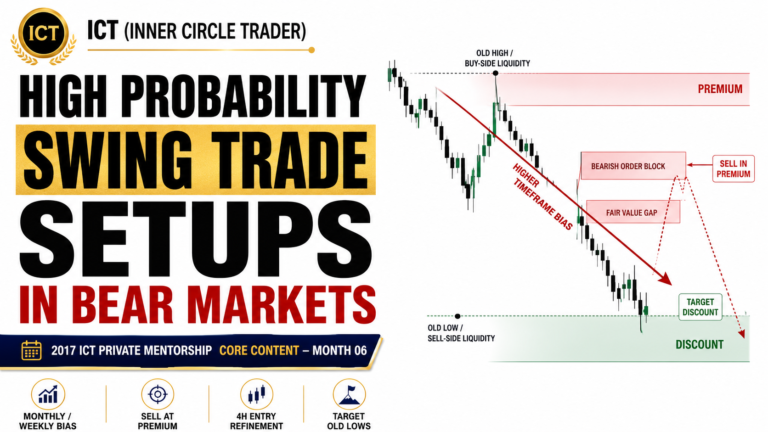
For bearish swing trades, traders may look for Premium PD Arrays such as:
- Bearish Order Blocks
- Bearish Mitigation Blocks
- Bearish Breakers
- Liquidity Voids above price
- Bearish Fair Value Gaps
- Old highs
- Old lows acting as resistance
- Rejection Blocks
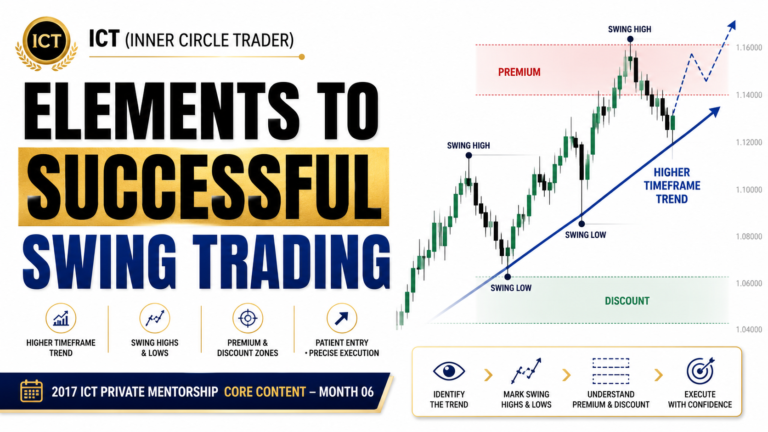
For bullish swing trades, traders may look for Discount PD Arrays such as:
- Bullish Order Blocks
- Bullish Mitigation Blocks
- Bullish Breakers
- Liquidity Voids below price
- Bullish Fair Value Gaps
- Old lows
- Old highs acting as support
- Rejection Blocks
Not every type of PD Array will be present in every range. The trader should move through the PD Array Matrix and identify the active levels available on the chart.
Frame Both the Entry and the Objective
A strong swing setup should have a higher-timeframe entry location and a higher-timeframe objective.
For example, in a bearish setup:
- The trade may be framed from a monthly Premium PD Array
- The downside objective may be a monthly Discount PD Array
In a bullish setup:
- The trade may be framed from a monthly Discount PD Array
- The upside objective may be a monthly Premium PD Array
This creates the possibility of capturing a large price range.
When the entry and target are both derived from monthly or weekly levels, the potential move may be several hundred pips.
The larger price range is what makes high R-multiple trades possible.
Use the Four-Hour Chart to Reduce Risk
Monthly and weekly charts provide the trade idea, but they usually require a very wide stop if used directly for execution.
The solution is to move down to the four-hour chart.
The four-hour chart helps the trader:
- Refine the higher-timeframe level
- Identify a more precise entry
- Reduce the stop-loss distance
- Locate short-term liquidity
- Use a clearer invalidation point
- Improve the reward-to-risk ratio
The trade remains based on monthly or weekly analysis, but the entry is executed on the four-hour chart.
This combination allows the trader to participate in a large higher-timeframe move without using a large higher-timeframe stop.
Higher-Timeframe Context, Lower-Timeframe Precision
The process can be summarized as follows:
Monthly or weekly PD Array establishes the location
Monthly or weekly opposing PD Array establishes the objective
Four-hour chart refines the entry
Four-hour price structure defines the stop
The higher-timeframe range provides the reward
This is one of the most important ideas in ICT swing trading.
A trader does not need to search for a random four-hour Order Block. The four-hour setup should form at a meaningful monthly or weekly level.
The higher timeframe provides the reason for the trade. The four-hour chart only improves execution.
Minimum Reward-to-Risk Ratio
ICT teaches that swing setups should generally offer at least a 3:1 reward-to-risk ratio.
This means that for every $1 risked, the potential reward should be at least $3.
However, when trades are properly framed around monthly and weekly PD Arrays, setups may frequently offer:
- 5R
- 8R
- 10R
- 12R
- 15R in exceptional cases
An R-multiple measures the reward relative to the initial risk.
For example:
- Risking $100 to make $300 is 3R
- Risking $100 to make $500 is 5R
- Risking $100 to make $1,000 is 10R
The larger the R-multiple, the lower the required win rate.
Why a High Win Rate Is Not Necessary
A trader using a 3:1 reward-to-risk model does not need to win most trades to remain profitable.
For example, over ten trades:
- Three winning trades at 3R produce 9R
- Seven losing trades produce a loss of 7R
- The final result is still positive by 2R
This means the trader could be wrong 70 percent of the time and still remain profitable before costs.
With 5R or 10R setups, the trader can tolerate even more losing trades while remaining profitable.
This is why reward-to-risk is more important than constantly trying to achieve an extremely high win rate.
Leverage Is Not the Same as Opportunity
High leverage is one of the main reasons traders lose control of risk.
A broker may offer:
- 50:1 leverage
- 100:1 leverage
- 200:1 leverage
- Even higher leverage in some markets
That does not mean the trader should use it.
Michael J. Huddleston states:
“Leverage is your Holy Grail in swing trading.”
This does not mean maximizing leverage. It means controlling it.
The trader should use only enough leverage to express the setup without exposing the account to unnecessary risk.
High leverage magnifies:
- Losses
- Drawdown
- Emotional pressure
- Position-management mistakes
- The impact of normal market volatility
Low leverage allows the trader to survive normal fluctuations and hold the trade toward its intended target.
Trading With Low Leverage
A trader does not need extreme leverage to generate meaningful returns from a high R-multiple setup.
For example, a trader may use relatively low leverage while risking only a small percentage of equity.
The return comes from:
- A precise entry
- A controlled stop
- A large higher-timeframe objective
- Allowing the trade to reach its target
The trader is not relying on oversized positions. The trader is relying on the distance between the entry and the objective.
This is a much safer business model.
Risk Per Trade
The appropriate risk depends on the trader, account size and trading plan.
However, the lesson emphasizes keeping risk small.
A swing trader may consider risking:
- 0.25 percent
- 0.50 percent
- 1 percent
- Up to 1.5 percent on selected setups
The exact number is less important than consistency.
The trader should never increase risk simply because a setup looks certain. There are no guaranteed setups.
The purpose of small risk is to ensure that a losing trade remains an ordinary business expense.
Example of Risk and Reward
Suppose a trader risks 1.5 percent of equity on a setup offering a potential 10R return.
If the setup reaches the full objective:
1.5 percent risk × 10R = 15 percent potential return
This does not mean every trade will produce 10R or that every position should be held to the final objective.
It demonstrates how a small amount of risk can produce a large potential return when the setup is framed correctly.
The trader does not need dozens of trades to create meaningful performance.
Swing Trading Is Low Frequency
High-quality swing setups do not appear every day.
Michael J. Huddleston explains that a trader may generally see one or two opportunities over a four-to-six-week period.
This gives the trader enough time to:
- Study several markets
- Map monthly and weekly PD Arrays
- Define potential objectives
- Wait for the four-hour setup
- Calculate position size
- Avoid impulsive entries
Low-frequency trading is an advantage.
The trader does not have to watch the chart every five minutes or take random trades due to boredom.
Quality Over Quantity
Many traders believe they must trade frequently to produce large returns.
The ICT swing-trading approach teaches the opposite.
A trader may find only a handful of high-quality setups during an entire year. However, a few trades offering 5R to 10R may be more valuable than dozens of low-quality intraday trades.
The focus should be on:
- The best higher-timeframe levels
- The clearest objectives
- The smallest reasonable risk
- The largest realistic R-multiple
- Patience between opportunities
Huddleston explains:
“You don’t have to rush. You don’t have to take every single swing trade.”
When the setup is not clear, the correct decision is to wait.
Maximizing Reward
Maximizing reward does not mean refusing to take partial profits or holding every trade indefinitely.
It begins by selecting a setup with enough available range.
Before entering, the trader should determine:
- The closest opposing PD Array
- The next daily objective
- The next weekly objective
- The next monthly objective
- The amount of risk required
- The potential R-multiple
The largest reward usually comes from targeting a higher-timeframe PD Array.
For example:
- Selling from monthly premium toward monthly discount
- Buying from weekly discount toward weekly premium
- Selling from an old monthly high toward the next monthly low
- Buying from a monthly Order Block toward buy-side liquidity
The higher-timeframe objective gives the trade room to develop.
Taking Partial Profits
Even when a setup offers 8R or 10R, the trader does not have to hold the entire position until the final target.
A practical method is to scale out at several objectives.
For a bearish trade:
- Take partial profit at a four-hour Discount PD Array
- Take another portion at a daily Discount PD Array
- Take more profit at a weekly objective
- Hold a small final portion for the monthly target
For a bullish trade:
- Scale out at four-hour Premium PD Arrays
- Reduce more at daily resistance
- Take additional profit at a weekly objective
- Hold a small portion for the monthly target
This allows the trader to secure profits while still participating in the larger move.
Do Not Force a 10R Trade
A setup should not be manipulated on paper simply to create an attractive R-multiple.
The entry, stop and target must all be technically justified.
The trader should not:
- Use an unrealistically tight stop
- Ignore nearby opposing PD Arrays
- Choose an impossible target
- Hold through clear invalidation
- Move the stop randomly
- Increase position size to compensate for limited range
The R-multiple is a result of good trade location. It should not be manufactured through poor risk management.
Example of a Bearish Swing Setup
A bearish swing setup may be framed as follows:
- Price trades into a monthly bearish Order Block.
- The market is positioned in premium.
- A monthly old high or Order Block mean threshold provides resistance.
- The trader moves to the four-hour chart.
- A four-hour bearish setup forms near the monthly level.
- The stop is placed above the four-hour invalidation point.
- The first monthly Discount PD Array becomes the objective.
- The difference between the small four-hour stop and large monthly target creates a high R-multiple.
In the lesson example, a trade with approximately 70 pips of risk had a potential reward of around 585 pips.
That represents approximately an 8:1 reward-to-risk ratio.
The important point is not the exact numbers. It is the method used to create the trade:
Monthly entry location
Four-hour execution
Monthly objective
Position Size Matters More Than Stop Size
Some traders become uncomfortable when they see a stop of 50 or 70 pips.
However, a wider stop does not automatically mean greater monetary risk.
The actual risk depends on the position size.
For example:
- A 20-pip stop with an oversized position can be extremely risky
- A 70-pip stop with a properly reduced position can represent only 0.5 percent risk
The trader should calculate position size based on:
- Account equity
- Maximum percentage risk
- Stop-loss distance
- Instrument value per pip or point
The stop should be placed where the trade idea becomes invalid. Position size should then be adjusted to keep the financial risk within the plan.
Common Risk-Management Mistakes
Swing traders often reduce their potential performance by making avoidable mistakes.
These include:
- Risking too much on one setup
- Using maximum broker leverage
- Entering without a higher-timeframe level
- Using a wide stop with full position size
- Chasing price after displacement
- Taking trades with less than 3R potential
- Moving stops due to fear
- Closing profitable trades too early
- Taking too many low-quality setups
- Trying to recover losses immediately
Avoiding these mistakes is often more valuable than finding additional entry patterns.
Practical Swing Setup Procedure
A structured process for reducing risk and maximizing reward may look like this.
Step 1: Define Maximum Risk
Decide the maximum percentage of equity that can be lost on the setup.
This must be established before calculating position size.
Step 2: Identify a Monthly or Weekly PD Array
Look for price trading into a meaningful higher-timeframe Premium or Discount PD Array.
This provides the setup location.
Step 3: Identify the Opposing Objective
Determine the first important opposing monthly or weekly PD Array.
This becomes the primary target.
Step 4: Move to the Four-Hour Chart
Look for a precise entry near the higher-timeframe level.
Possible entry models include:
- Order Block entries
- Stop entries
- Limit entries
- Liquidity sweeps
- Rejection Blocks
- Fair Value Gap retracements
Step 5: Define Invalidation
Place the stop where the technical setup is no longer valid.
Do not choose a stop based only on the amount of money you want to risk.
Step 6: Calculate Position Size
Reduce or increase the position size so that the stop represents the predetermined percentage risk.
Step 7: Calculate the R-Multiple
Divide the potential reward by the initial risk.
The setup should preferably offer at least 3R.
Step 8: Plan Partial Profits
Mark the four-hour, daily, weekly and monthly levels where the position may be reduced.
Step 9: Execute and Wait
Allow the swing trade enough time to develop.
Avoid managing it like a five-minute scalp.
Swing Trade Risk and Reward Checklist
Before entering a swing setup, confirm the following.
Higher-Timeframe Location
- Is price reacting from a monthly or weekly PD Array?
- Is the market in premium for a short setup?
- Is the market in discount for a long setup?
- Is there a clear higher-timeframe objective?
- Is the range large enough to justify the trade?
Entry and Stop
- Is the entry refined on the four-hour chart?
- Is the stop placed beyond technical invalidation?
- Has position size been calculated correctly?
- Is the monetary risk within the trading plan?
- Can normal market volatility be tolerated?
Reward Potential
- Does the trade offer at least 3R?
- Is 5R or more realistically available?
- Are nearby PD Arrays likely to block the move?
- Are partial-profit levels marked?
- Is the final objective based on a monthly or weekly level?
Leverage and Exposure
- Is leverage being controlled?
- Is the position unnecessarily large?
- Is the trader relying on leverage rather than trade quality?
- Would a loss remain manageable?
- Can the position be held without emotional pressure?
Trade Frequency
- Is this genuinely a high-quality swing setup?
- Is the trade being taken due to boredom?
- Has the trader waited for the correct higher-timeframe level?
- Is there a reason to skip the setup?
- Would waiting produce a better opportunity?
Final Thoughts
The purpose of Reducing Risk & Maximizing Potential Reward In Swing Setups is not to eliminate losses. Losses are an unavoidable part of trading.
The objective is to make every loss small while allowing selected winning trades to become significantly larger.
The ICT (Inner Circle Trader) method accomplishes this by combining:
Higher-timeframe monthly or weekly PD Arrays
Large opposing price objectives
Precise four-hour entries
Controlled position size
Low leverage
Minimum 3R reward-to-risk
Patience between setups
The trader does not need to take many trades or use excessive leverage.
A small number of well-framed swing setups can be enough when each trade risks little and offers the potential to return several times the amount placed at risk.